5 Easy Steps to Install Cabinet Handles Like a Pro
Installing cabinet handles might seem like a small task, but it can dramatically change the look and feel of your kitchen or bathroom. Whether you're updating old handles or installing new ones, doing it right ensures a professional and polished result. This guide will walk you through five simple steps to install cabinet handles, making it easier than ever to get that expert finish, even if you're new to DIY.
In this article, we will also explore various cabinet handle styles, review the popular brand Buster & Punch, and highlight the best places to find coupons for Buster & Punch products, such as on DoBargain. By the end, you'll have all the knowledge you need to confidently install cabinet handles, whether you're going for a modern, minimalist, or industrial look.
Step 1: Choosing the Right Cabinet Handles
Before diving into installation, it's crucial to choose the right handles for your cabinets. This choice can affect both the functionality and aesthetic appeal of your space.
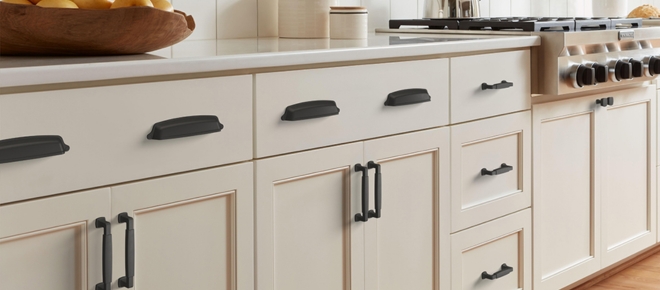
Types of Cabinet Handles
- Knobs: These are small, rounded fixtures attached with a single screw. Knobs are versatile and often used for both drawers and cabinet doors. They come in various materials like ceramic, metal, or wood.
- Pulls: Also called handles or bar pulls, these are attached with two screws and are generally larger than knobs. Pulls offer a modern look and are perfect for people who want a minimalist, clean appearance.
- Finger pulls: A more subtle option, finger pulls have a sleek design that allows you to open cabinets by simply hooking your finger around them. They are often hidden from sight and create a minimalist look.
Material Options
Choosing the right material can enhance durability and match your decor. Here's a breakdown of common materials used for cabinet handles:
- Stainless Steel: A popular choice for modern kitchens and bathrooms due to its durability and sleek appearance. It resists rust and stains, making it ideal for high-moisture environments.
- Brass: Known for its timeless and elegant look, brass is a traditional favorite. It adds warmth and works well with vintage or classic-style interiors.
- Zinc Alloy: Economical and versatile, zinc alloy handles are available in a wide range of finishes, making them a popular choice for budget-friendly installations.
- Wood: For a rustic or natural vibe, wooden handles add warmth and texture. While not as durable as metal, they offer a unique aesthetic.
- Glass or Crystal: These handles are typically used in more formal or elegant spaces and add a touch of luxury to your cabinets.
Buster & Punch Review
Buster & Punch is a well-known brand that focuses on creating high-quality, unique home fittings, including cabinet handles. Their products are known for their distinctive industrial style, combining solid materials like steel, brass, and wood. Here's what makes Buster & Punch stand out:
- Design: Buster & Punch handles are renowned for their bold and edgy designs. They often feature knurled patterns, solid metals, and a modern, industrial aesthetic.
- Durability: Made from high-grade materials, these handles are built to last. Their solid brass and stainless steel products are particularly favored for their strength and resilience.
- Versatility: Despite their industrial style, Buster & Punch cabinet handles fit well in a variety of settings, from contemporary kitchens to vintage-inspired bathrooms.
For those looking for a deal, you can often find Buster & Punch Coupon Codes on DoBargain, a platform that offers exclusive deals and discounts. Shopping on sites like DoBargain.com ensures that you get high-quality products at a fraction of the retail price, making it easier to elevate your home design without breaking the bank.
Step 2: Measuring for Precision
Accuracy is key when installing cabinet handles. Incorrect placement can lead to uneven handles, giving your cabinets a sloppy appearance.
Tools You’ll Need:
- Measuring Tape: A tape measure ensures you mark precise locations for your handle holes.
- Template or Jig: A handle template helps you mark where the screws need to go, ensuring uniform placement across all drawers and doors.
- Pencil: Use a pencil to make light marks on your cabinet doors where you intend to drill.
How to Measure for Handle Placement:
- Horizontal or Vertical?: The first decision is whether you want your handles installed horizontally or vertically. Pulls are usually horizontal on drawers and vertical on doors.
- Center Point: For pulls, the standard placement is to find the horizontal center of the drawer. For knobs, the center of the panel or door is ideal. Use your measuring tape to locate the midpoint and mark it.
- Height on the Cabinet Door: For vertical placement, handles are typically installed between 2.5 to 3 inches from the top or bottom edge of the cabinet door.
- Uniformity is Key: If you're installing handles on multiple cabinets or drawers, make sure to use the same measurements across all units. Consistency ensures a polished, professional look.
Step 3: Drilling the Holes
Once you've measured and marked the correct spots, it's time to drill the holes.
Tools You’ll Need:
- Drill: A power drill with a drill bit that's slightly smaller than your screws.
- Drill Bit: Match the size of your drill bit to the screws that came with your handles. Typically, a 3/16-inch bit works well.
- Masking Tape: Place a strip of masking tape over the spot where you'll be drilling. This prevents the wood from splintering.
How to Drill:
- Double-Check Your Markings: Before drilling, make sure the measurements are correct and consistent across all cabinets.
- Steady Your Drill: Place the drill bit on the mark, keeping the drill perpendicular to the cabinet surface. Apply steady pressure and drill straight into the cabinet.
- Drill Through the Tape: Drilling through masking tape reduces splintering, leaving a cleaner hole for the screw.
- Clean the Holes: Remove any dust or debris from the drilled holes to ensure a smooth installation.
Step 4: Installing the Handles
Now that your holes are drilled, you're ready to attach your new cabinet handles.
Tools You’ll Need:
- Screws: Most handles come with screws, but it's important to make sure they're the correct length for your cabinet doors.
- Screwdriver: You can use a manual or electric screwdriver to attach the screws to the handles.
Installation Process:
- Align the Handle: Line up the handle with the drilled holes and insert the screws from the inside of the cabinet or drawer.
- Tighten the Screws: Using your screwdriver, tighten the screws until the handle is securely in place. Be careful not to overtighten, as this can damage the cabinet surface.
- Check for Tightness: Once all handles are installed, check to make sure they are all secure and evenly aligned.
Step 5: Finishing Touches
The final step involves cleaning up and adding any finishing touches to complete the look.
Tools You’ll Need:
- Level: A small level ensures that your handles are aligned properly.
- Cleaning Cloth: Use a soft cloth to wipe down the handles and cabinets after installation to remove any dust or smudges.
Final Adjustments:
- Check Alignment: Use a level to check the alignment of each handle. If one is slightly off, you can loosen the screw, adjust the handle, and retighten.
- Polish and Clean: Once everything is properly installed, wipe down the handles and surrounding areas to remove any fingerprints, dust, or debris.
Bonus Tips for Pro-Level Installation
- Use a Template for Consistency: If you have multiple cabinets or drawers to install handles on, using a handle template or jig will save you time and ensure precision.
- Pre-Measure Screws: Sometimes the screws that come with your handles may be too long or too short. Pre-measure and, if necessary, purchase the correct screw length before starting your project.
- Avoid Splintering: As mentioned earlier, using masking tape while drilling helps prevent the wood from splintering. This is especially useful for wooden cabinets.
- Use the Right Tools: Invest in a quality drill and screwdriver. A drill with variable speed settings will allow you to drill slowly, ensuring more accurate results.
Conclusion
Installing cabinet handles doesn't have to be a daunting task. With the right tools, materials, and a little bit of patience, you can achieve professional results. Whether you're updating your kitchen, bathroom, or a piece of furniture, the steps outlined above will guide you through the process, ensuring your cabinet handles are installed with precision and care.
And don't forget, if you're in the market for stylish and high-quality cabinet handles, check out Buster & Punch products. For great deals, including discounts and exclusive Buster & Punch coupons, head over to DoBargain. These savings will allow you to elevate your space while staying within budget, giving your home a luxurious, custom look without overspending.
Now that you're equipped with everything you need, it's time to get to work and install those handles like a pro!


Time: 12:00 AM Date: 14-7-2024
It’s clear you put a lot of effort into this. Well done!
Time: 12:00 AM Date: 14-7-2024
“You want. You want to be changed, you want yourself anew, but never not you.” While I enjoyed the entire story, these particular lines spoke to me. Amazing work!